It’s not always that you will find a gym or a campground to make a pit stop and get yourself cleaned. What more, if you don’t have a shower in your van, boy, it will be a pickle! Knowing your road shower alternative is the best way to get yourself cleaned without having to think about where you are going to go next.
What are the best road shower alternatives? First is the rooftop solar shower, where you can build it yourself if you have the tools. Second, you can purchase portable showers that are usually used for camping. The Rinsekit is one of the popular ones in the market.
If you have a road shower alternative, you don’t need to worry about where to take a shower or if you ever run out of fresh water. This article will talk about how you can make your own rooftop solar shower, what are the best portable showers that you can buy, and what to consider when you are getting a portable shower.
Strap Your Road Shower to Your Van
The road shower can be solar or not. It can be huge because when placed in your van, it has to maximize your rooftop space. However, this is a permanent solution to your shower problems on the road. You can buy a rooftop solar shower for about $440. However, if the amount is out of your budget, you can go the DIY way.
The downside of using this alternative is the large pipe system is heavy on one side of the van, especially when it is filled up. It is also an eyesore when you are living and traveling in your van. So, if you want to make a stealth living, this is not the best option for you.
Also, it can be challenging to find places where to fill up the shower with water. Due to the fact that it is strapped on the roof, you always need to find a hose that is long enough to reach the valve. Then, when you are ready to take a shower, you need to position your car at an incline so the water will flow.
Needless to say, it is still one of the best solutions for your showering needs. In the next section, I will provide the steps on how you can make your own DIY rooftop solar shower.
DIY Rooftop Solar Shower
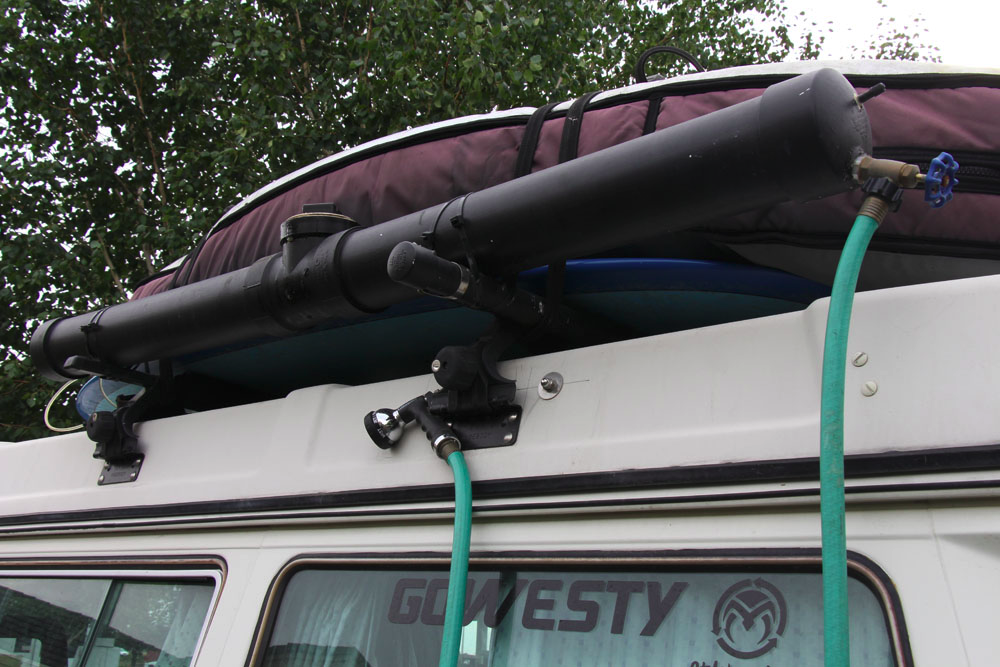
Image Source: wheresmyofficenow.com
A rooftop solar shower is one of the most popular and best solutions that you can find in the shower area of your van life. Though it may be challenging to do, it will all be worth it once you have finished your rooftop solar shower. With the right tools and materials, you will be ready to start your life on the road in no time.
Supply That You’ll Need For Your Rooftop Solar Shower
- 1- 10′ length of 4″ Schedule 40 ABS pipe (this will depend on how much water you want the shower to hold)
- 2 – 4″ ABS end caps
- 1- 4″ T-joint ABS fitting with threaded top opening
- 1 – 4″ ABS cleanout cap for T-joint
- 1 – 1/2″ brass locknut
- 1- flat rubber O-ring
- 2 – canoe foam blocks (optional: you can place these on your vehicle’s crossbars and keep the shower more secure; alternatively, you can use ties instead of the foam for a more secure hold.)
- 1 – Schrader valve from an aluminum wheel; available at any tire/wheel shop
- ABS cleaner/primer
- ABS cement
- Waterproof silicone sealant
- Sandpaper
- Tie-down straps
- Petroleum jelly
- Schrader bike pump
- One 3/4″ hose spigot
- Hose with nozzle
Important Tools You’ll Need
- A hacksaw
- A drill with 1/8″, 3/4″, and 3/8″ bits
- A marker
Creating Your Rooftop Solar Shower
Decide How Much Water You Need
You need to make sure how much water you want the shower to hold and, at the same time, the overall weight once it is filled. A six-foot-long shower would hold about 4.5 gallons of water. You can now determine this by the amount of shower time that would give you an estimate of the psi (per square inch) you pump in the shower to and the type of nozzle you are using.
The six-foot-long shower is based on a person that takes about 10 to 15 minutes of shower time. So, before you buy your supplies and start on your solar shower, determine how long you take a shower first.
Cut The Main ABS Pipe
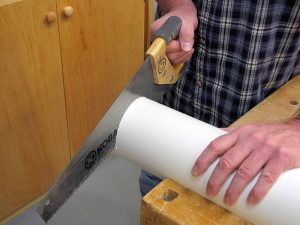
Image Source: birdwatchersdigest.com
The next thing that you should do is measure the length of 10′ of ABS to 5’6″ and mark the spot with a marker. With a hacksaw, cut at your measurement. Then, measure and mark at the 6″ length from the remaining pipe and cut on the mark that you have made before.
Once this is done, you will have an extra piece of ABS, a 5’6″ length, and a 6″ length.
Cut Foam Blocks (Optional)
Suppose you decide to use a foam canoes block, position one end of the 4″ ABS pipe on the side of the one block. Make sure that one of the blocks is not blocking the bar cutouts. Keep the bottom of the pipe close to the middle of the block. Do not overlap it with the bar cutout.
When that’s done, mark the pipe’s outline with a marker. Use a hacksaw to cut out the semicircle of the foam and repeat with the other block that you have.
Drill a Hole for Spigot
Place the brass locknut inside one of the end caps that are close to the outside edge as possible. Make sure that it doesn’t touch the edge. Mark the inside circumference with a marker, and then remove the locknut and make a mark on the middle of the circle. Start with a ⅛” bit and work up to ¾” bit.
Then, drill a hole on the dot through the end cap. When you are done, you should have a finished hole about ¾” across, giving you a wide enough hole for the spigot to fit through.
Install Schrader Valve
Mark a dot directly above the spot where the spigot hole is. This is about ¾” from the edge of the end cap. Then, using the ⅜” bit, drill a hole at the dot. After that, run the valve through from back to front. This way, it will stick out on the smooth face side. Then, place the flanged washer narrow side first onto the front of the valve stem.
While holding the washer and valve in place with one hand, use the other to apply a bead of silicone on the front opening.
Install Spigot
Place your rubber O-ring over the threads of the spigot. You can use a used round O-ring. However, a flat one would provide better results. Apply the bead of silicone around the O-ring’s bottom, then insert the spigot into the front face of the end cap. Once that’s done, hold it in place with one hand, then apply another bead of silicone around the spigot threads.
You need to make sure that the spigot is in the inside face of the end cap to create an airtight seal. Then, screw the fastener onto the spigot. Let the silicone cure according to the package instructions.
Assemble and Glue
For the rough edges of the pipe, use sandpaper to smoothen them out. Make sure that you do this process in an area that has adequate ventilation. Use the ABS cleaner to clean and prime your pipes for gluing. Clean the outside ends of the 4″ pips and the inside edges of the T-joint as well as the end caps.
Ensuring that you are working a piece at a time, apply the ABS cement to the inside and outside of the end cap. Once that’s done, press them together firmly. Assemble the following pieces together: plain end cap, 5′ ABS pipe, T-joint, 6″ ABS pipe, end cap with spigot. Take note that this order should be followed.
Keep the end cap valve and T-joint opening aligned at the top of the shower, and the spigot should be pointing down. Let the cement cure.
Installing in Your Car
You are almost done! Slide the foam blocks, if you are using any, into your crossbars. Then, palace the shower on top of the blocks. The spigot should be on the rear end of your car. Then, use tie-down straps to secure your shower to the crossbars with the spigot facing down. To make this process easier, make sure to grab some help from a friend. This way, they can hold the shower down while you secure it.
Fill with Water
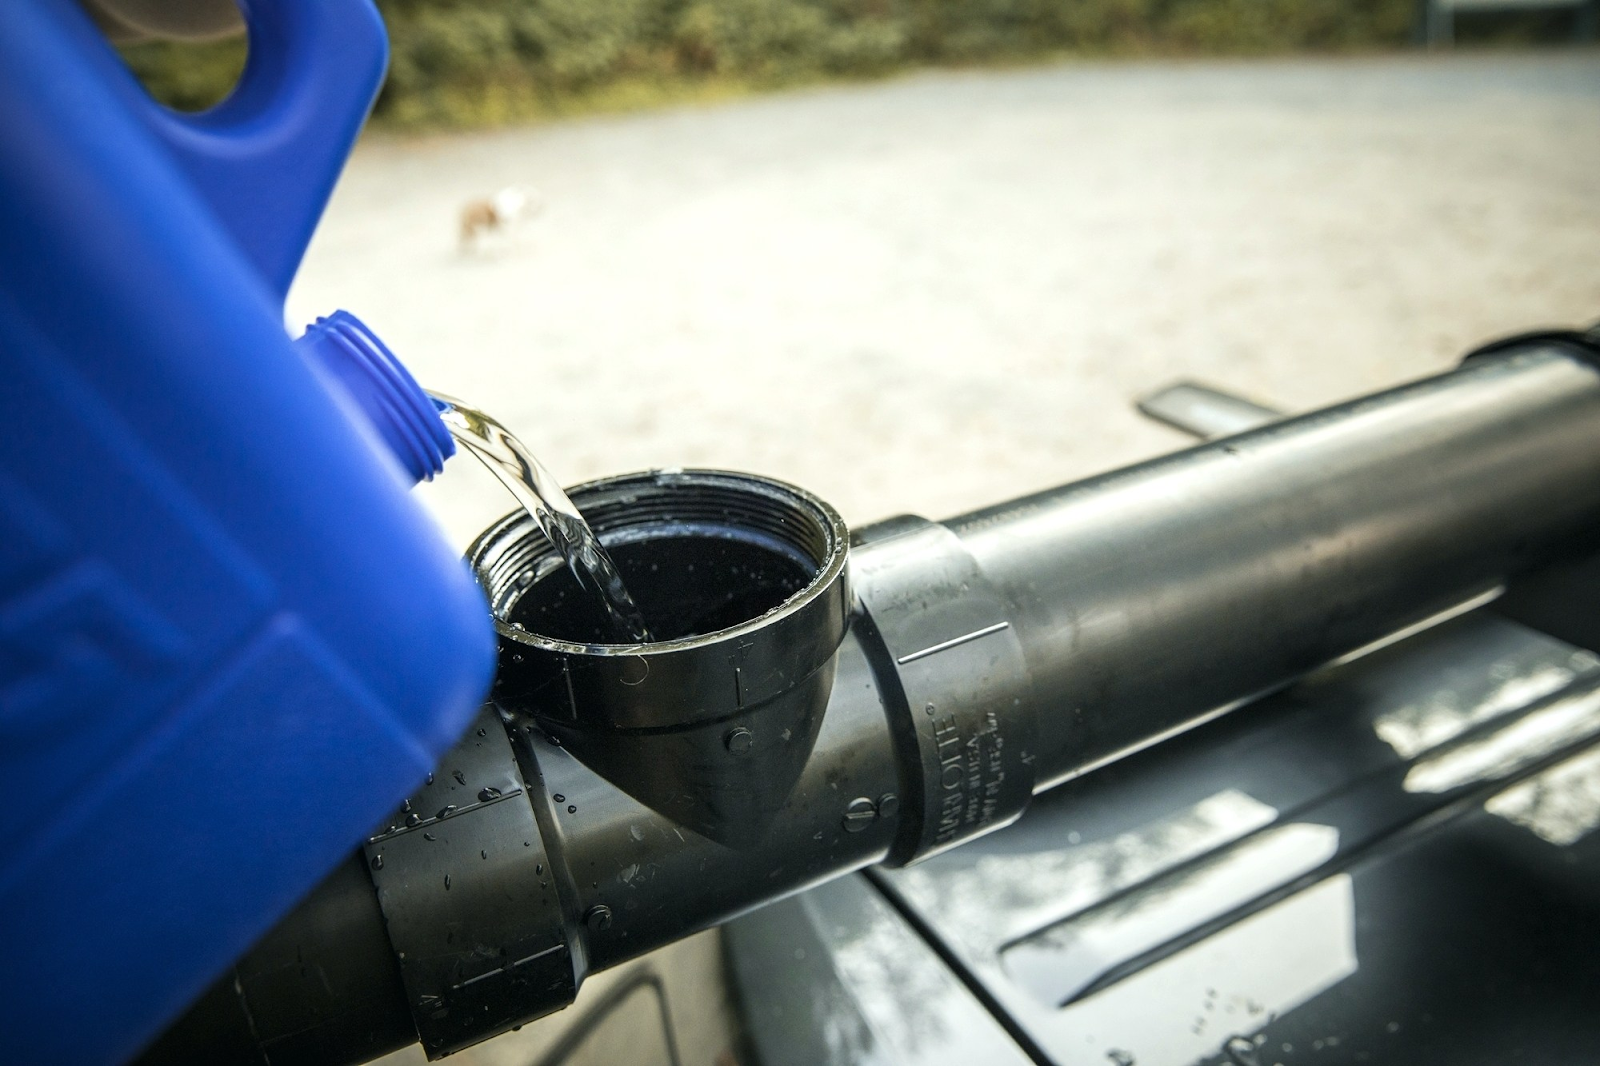
Image Source: joeppelt.net
Unscrew the cleanout cap, then use a hose or jug to fill your shower with water. Make sure not to fill it all the way because you need to leave space for the air to be pressurized. Then, secure a tight seal by applying petroleum jelly to the cleanout cap’s threads and screw it back on hand-tight.
Pressurized that Shower
To pressure your shower, screw the hose with nozzle to the spigot. Unscrew the valve cap and attach your bike pump or air compressor. Then, pump until the desired pressure is reached and screw the valve cap back on. Never go over your pipe’s pressure rating!
Get Ready to Be Refreshed!
Now, you are ready to enjoy your new shower. Take note that the longer it sits in the sun, the water will be. So, if you want a warm bath, then this is the trick. You no longer have to worry about finding a campground or paying for a gym to take a shower. You can clean those dirty feet, sticky hands and give your sweaty kids a shower anytime, anywhere.
Again, make sure that you follow the Leave No Trace Principle. Use soap and shampoo that is biodegradable and when taking a shower near water bodies, make sure you are 200 feet from the said water. Also, don’t use this water for your cooking or drinking needs.
Things to Consider When Getting Portable Pressurized Shower
Now, before going out there purchasing an alternative road shower, you need to consider some factors. First, you need to think about the portable shower’s usability. The last thing that you want to do is purchase a portable pressurized shower that is hard to set up. You would want something that is easy to use and ready to go when you need it.
Second, you need to determine how much water a portable pressurized shower can hold and how long it will last. Find out how frequently you have to refill it if you have an entire family that needs to use it. Make sure to always look out for the capacity of a particular portable pressurized shower and how long it says the shower will last before needing to refill it.
Of course, it is always a good idea to manage your shower time so that you can lessen the time that you need to refill the water on your portable pressurized shower. Lastly, you need to consider the accessories that are available for your portable shower. You may be interested in accessories that you can get for the shower to make it a more enjoyable experience.
Whether it is shower wipes to ensure the cleanliness of the shower, a soap caddy, or a non-slip matt, you need to make sure that these are available not only for your needs but also for your wants. Since you are on the road, you want your shower experience to feel like you are in a home.
Portable Pressurized Camping Shower
Aside from the rooftop solar shower, you can also go for the portable pressurized camping shower—no need to build anything. You can just go out or go online to get yours. It is also not as bulky as the solar shower, and it is easy to store.
RinseKit Portable Sprayer
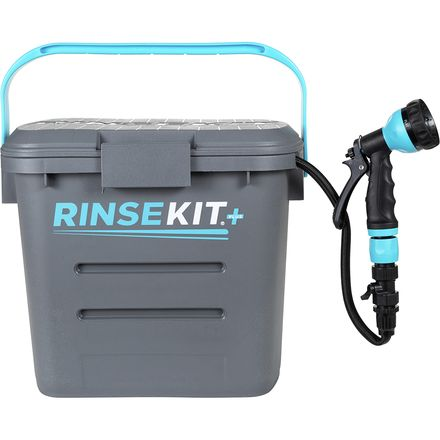
Image Source: motosport.com
One of the most popular choices when it comes to portable pressurized showers is the RinseKit Portable Sprayer. It can deliver pressurized water for up to three minutes. This means that you can quickly fill the shower with hot or cold water. With the two-gallon pressure chamber, you can rest assured when you are done with your shower, and you will feel refreshed and cleaned.
It also has a built-in ruler to measure the pressure. The RinseKit also comes with a spray nozzle that has seven different settings, from jet stream to a soaking shower. It has a foldable handle, which is easy for one-handed-carrying. Aside from that, it has a removable lid, making the cleaning process very easy.
The RinseKit is portable, and it is as big as a drink cooler. It comes with a hose nozzle, 6-inch hose, hose bib adapter, on/off valve, and quick connect when purchased. It is sort of like having a garden hose whenever it is needed. The RinseKit comes in two sizes, the original and the Plus.
Both can store up to two gallons. Original can provide you with four minutes of showering time, while the RinseKite Portable Sprayer Plus is around six minutes. The original RinseKit Portable Sprayer costs $214.95, while the Plus costs $109.95.
KIPIDA Five Gallon Solar Shower
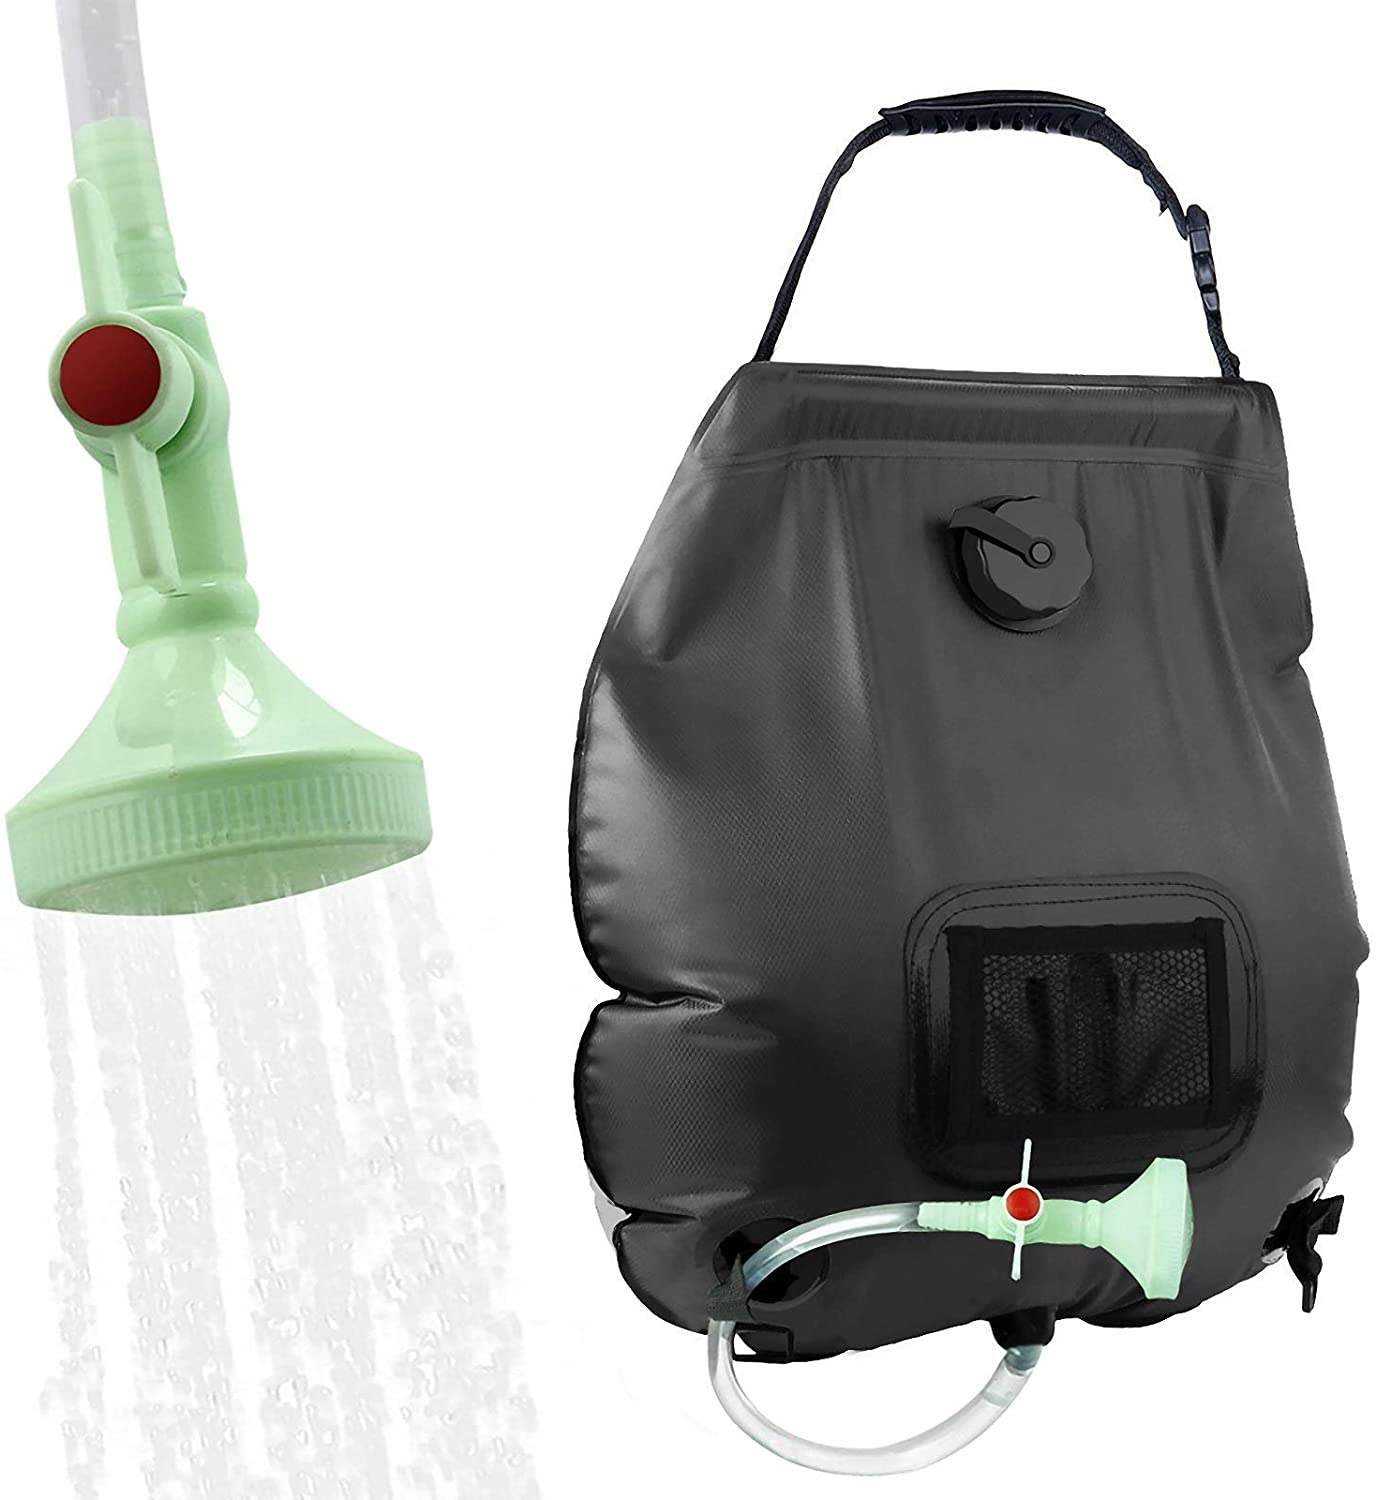
Image Source: amazon.com
The Kipida is a solar shower bag that has a heat-absorbing design. The solar shower is made of leak-proof and environmental material. It can heat water up to 113°F. Make sure to place the bag directly in the sunlight for about three hours if you want to use hot water during your shower.
It can carry up to five gallons, which is a bit more than the RinseKit. When purchasing the bag, it comes with accessories such as a hose, shower head, and a water tap. It has an easy on and off function as well as a temperature indicator that is attached to the bag. The Kipida also has a mesh pocket where you can place your toiletries.
The cost of the Kipida’s Five Gallon Solar Shower is $39.99, which is a lot cheaper than the RinseKit.
WolfWise Pop-Up Shower Tent
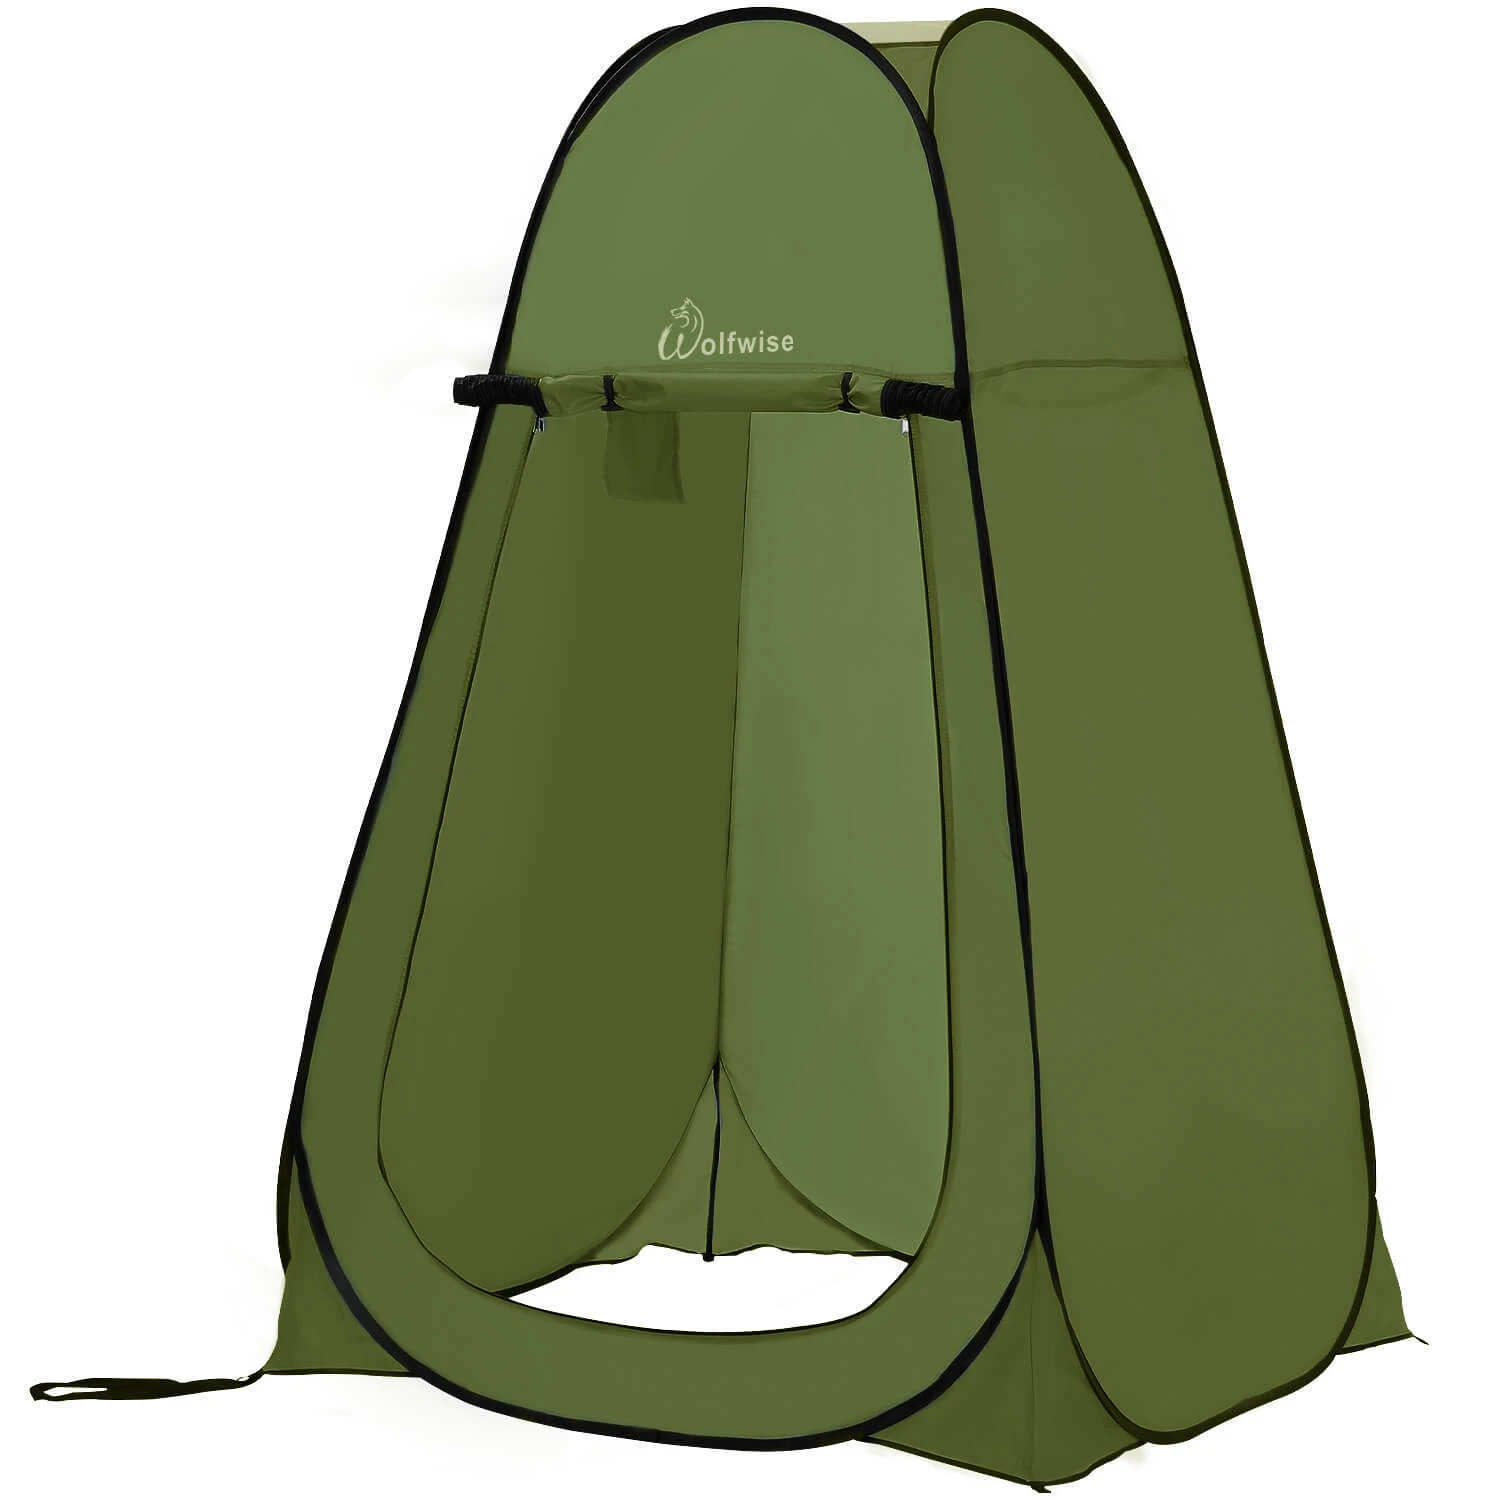
Image Source: wolfwise.com
If you want privacy while you are taking a shower, this is the perfect combination for your portable shower. It is made of polyester and comes in two colors, green and blue. It has a spacious space with 47.2″ L x 47.2″ W x 74.8″ H in size. A tall man can fit comfortably in this tent.
It has a multi-function purpose. A shower tent that offers private space for using the toilet or taking a quick bath when you are in a public space. The WolfWise shower tent has a pop-up design that can be popped up and folded down in seconds. You don’t need to worry about any assembling.
It is lightweight, easy to store, and doesn’t take too much space on your van. It comes with a carrying bag so that you can bring it anywhere. The cost of this handy tent is $39.99.
Conclusion
Knowing your road shower alternative options is essential. It prevents you from worrying about finding a place to take a shower. Also, you don’t need to pay every time you need to clean yourself because all you need is water to refill your portable or rooftop shower. With the perfect solution for your shower, you can always feel clean and refreshed wherever or whenever!