

Recreational vehicles have been used as a home for several individuals. Others stay in the RV for great adventures and camping. With that, it is far more salutary to add skylights to your recreational vehicles. A skylight is not just an RVer’s trend; it is more than that. It is not only limited to the beautiful view of the sky, shining stars at night, warming sunshine because there is more.
How to measure a recreational vehicle skylight? Choose the perfect RV roof location to make a skylight opening. Measure the dimensions. Look for the RV skylight suitable to the roof opening dimensions, and install it carefully. Make sure to get an accurate measurement.
One of the great things about skylight is the do-it-yourself process in installing it to recreational vehicles. The skylight adding operation requires less labor and low maintenance than the other RV amenities. However, this does not mean that precision is disregarded because attaching skylight to the RV requisite accurate measurement. I have always been fascinated with great views, and having an RV skylight is indeed a good idea. If you plan to DIY your additional accent to your RV, this article will share the step-by-step process to measure RV skylight. It will also highlight the significance of accurate measurement dimensions in a skylight.
Fundamental Process: Measuring New RV Skylight
Installing skylights to your recreational vehicles is not like a simple attachment of a picture frame in the wall because it needs precision at every angle.
Learning RV Skylight Dimensions
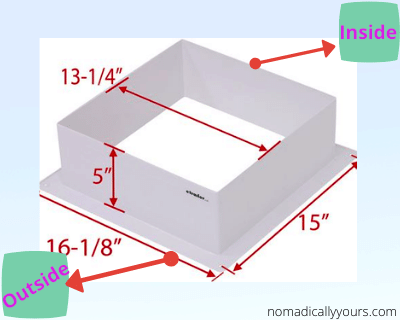
RV skylight has a standard size of 14” to 72” in width and 16” to 96” in length. This size applies to the skylight of flat-tempered glasses. Whether you are adding or replacing RV skylight, you still need to know sizes-dome and flange to develop specific dimensions for accurate measurements and installation. For the rectangular shape of the RV skylight, the most miniature dome is 14” by 14” by 14” and a flange size of 18” by 18” . The biggest rectangular shape skylight dome is measured 30” by 30” and flange of 34” by 34”.
Different models have different ranges of dimensions in terms of skylight dome and flange.
Determining these dimensions helps you install the skylight effectively with no error. After choosing the kind of skylight according to its dimensions, you can now start measuring the skylight.
Measuring New RV Skylight: The Step-by-Step
Find the perfect roof location where you want to place your skylight. This means you have to consider everything, not just the spot where you want the sunlight rays to hit. Because the roof of an RV is full of electrical wires, make sure to look for the perfect spot. The ideal area to install the RV skylight is the thinnest part with no electric cables. Now that you have looked and found that perfect spot, measure the dimension of your RV skylights.
If you already have a skylight available, then you are good to go. But if none, you can directly look in online or physical stores to find the perfect size of the skylight you have in mind. In choosing the ideal skylight dimension, consider your chosen area if it is suitable or not.
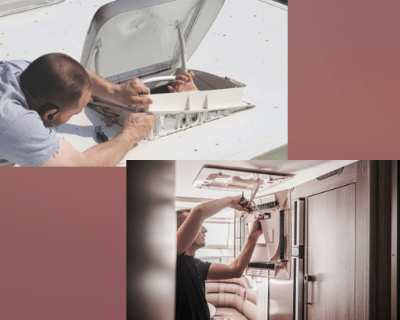
If your RV is not built with a skylight and you want to get one, you may wish to consult with an expert to install it because cutting a hole in the roof is not easy, for it might cause severe damage to the RV. For DIY RV skylight installment, you will cut the chosen spot on the roof for the opening. Then install the RV skylight once the opening is ready.
Valuing RV Skylight Measurement
The proper way of skylight measurement is vital for the following reasons. Reckless skylight measurement will cause damage to your recreational vehicles, which probably cost thousands of dollars. A skylight may not fit the RV roof opening if there are inappropriate measurements. If you chose to DIY the roof cutting of the RV, there is a possibility that you can damage your RV roof during the cutting procedure when you do not get the proper measurement.
Replacement Operation: Old RV Skylight

It is inevitable for your RV skylight to last for a lifetime because it is constantly exposed to different weather like summer. Though many of the RV skylights are sun and UV rays resistant, still it will age hence replacing them are necessary.
Why The Need For Replacement
RV skylight replacement is common because it might become brittle, cloudy, and yellow outer glass, which is constantly exposed to sun or rain. You can also find a crack in the RV skylight, which may lead to roof leakage. This is why the RV owner replace it because a cracked skylight and leak roof may cause severe damage inside that will require more money.
Not just the outer layer of the RV skylight may have problems but also the inner layer, so it is always a good idea to check it regularly. Between the inner and outer layer of the skylight is the space capable of accumulating dirt and many others. This should also be remedied to prevent too much dirt from accumulating that can cause further damage to the Skylight fitting. RV users should have also changed their skylight if the sealant starts to lose or leak.
Replacing RV Skylight Properly
Replacing an RV skylight is just a piece of cake that anyone can DIY. Before replacing it, measure first the old RV skylight. Measure the width and the flange that contains screws to attach the rooftop. Now visit an online RV skylight store, or directly go to your local store to find the right skylight for replacement. Your new RV skylight dome should cover the whole existing skylight before so that it will be suitable for its opening.
The new RV skylight flange should be as wide as the old one or broader than before, covering the old screw holes. Figure out the suitable sealant suggested by the manufacturer by reading the skylight instructions. Scrape the old sealant carefully away with the use of a putty knife. Make sure not to damage your RV roof and scrape until you see the old screws.
Remove the old screws on your RV roof and inspect each one of them to ensure they are not rusted or damaged because you can reuse them. Use your putty knife again to remove the old skylight from your RV roof. Lose the old dome little by little until you can pull them away so that your roof will not be damaged. Be extra careful if you have a rubber roof to make sure ripping will not happen.
After the dome is removed, scrape away the old sealant by utilizing a putty knife. Mineral spirits and old rag are helpful to clean the roof from the remaining old sealant. Again, take extra care of the rubber roof.
Next is to cover the old screw holes with the suggested sealant from the manufacturer. A single thick bead of the recommended sealant is applied around the skylight opening, covering each of the old screw holes, for the new dome has a different screw holes pattern. If all the original screw holes are sealed, create new holes for the new skylight dome.
Get your new RV skylight then place it on top of the bead sealant. Make sure to create a bond between your dome and the RV roof by spreading the sealant through wiggling back and forth the dome. Be sure to place your skylight at the center over the roof opening. Fasten the new RV skylight with the use of self-tapping screws. The self-tapping screws will also create new holes so that skylight can be effectively attached to your RV roof. Tighten each of the screws of your skylight on the roof until new dome plastic shows off. However, do not over-tighten your screws to avoid damage to the new skylight dome.
If the sealant is showing off while tightening your screws, don’t worry. It is perfectly normal. Seal with the manufacturer’s suggested sealant around the edge of the new RV skylight. This creates a layer that serves as a barrier on either the water or the inside of the RV. Use the sealant again to cover each of the screws used to attach the new skylight on your RV. Air dry your sealant and observe for any shrinkage, then check after hours. Look for problematic areas and apply sealant.
RV Skylight Products You Can Choose From
Skylight manufacturers design various RV skylights so that customers will have many choices. Different RV skylights are created for other RV so that everyone can choose the perfect skylight suitable for their RV. Not only the varying designs of the RV skylight but also its unique features.
Popular RV Skylights
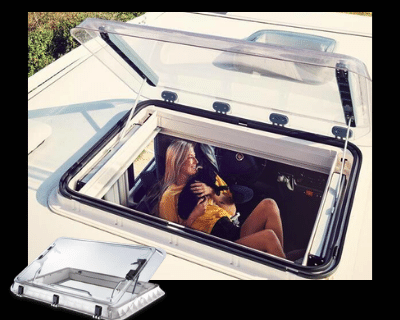
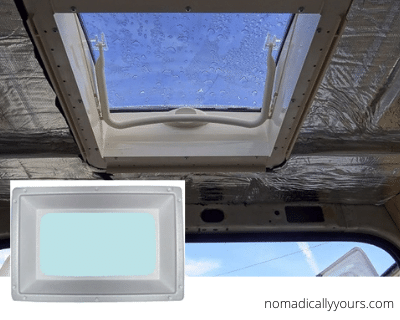
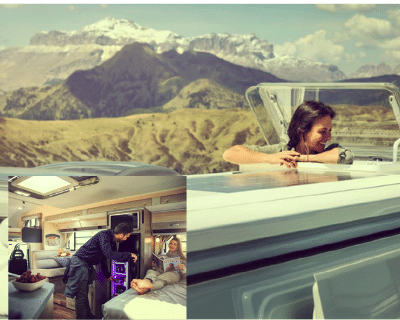
Fixed dome RV skylights are popular not only for their affordable price but for their durability and dome shape. A dome shape skylight will prevent the water from flowing down. Ventilating RV skylights is another popular type of RV. Though this does not come with a dome shape for a wide spread of light, it has electronic lifting skylights so that you can roll it out. Tinted/glaze RV skylights are just one of the best because they will protect your RV as well as the best view of the sky. If the skylight is not tinted, you have a clear picture of the surroundings but subject to high heat transfer inside the RV. It is also lovely to make it tinted to keep your life inside your RV private since it does not provide a clear view from people outside.
Recommended RV Skylights
The recommended best budget skylights for your RV are the BriRus K1422WLP White Low Profile Exterior and the Specialty Recreation K1422 Low Profile Single Pane Exterior Skylight.
Premium heavy-duty, Icon 01858, Icon 01866 are the best premium RV skylights kits. RV skylight having the best dome are the Icon 01981 and the BriRus SL 1414W 14 X 14 Inch Rectangle White RV dome.
Tricks Towards A Longer Use of RV Skylights
Similar to RV batteries, skylights require cleaning and maintenance to make them last longer. Having your RV skylight checked and maintained helps you prevent further damage with your RV amenities, particularly the skylight leakage, and loosen its sealant. This is why clean your RV skylight and be guided with the proper ways below.
Simple Maintenance
Check your RV skylight several times every year. Look for the wear or tear skylight area. Check the sealants if they have cracked or brittle. A cracked skylight sealant will eventually leak, which is another cost of money. You can replace your RV skylight as soon as cracks are observed.
Cleaning RV Skylight Dome
Use a mild detergent like a 409 cleaner with lukewarm water and a clean sponge or any soft cloth to wash your RV skylight dome. Of course, rinse thoroughly with clean water. Let it dry with the aid of a moist cellulose sponge so that water spots are prevented. Take note not to scrub the polycarbonate skylight dome.
Paint splashes, smeared with any substance or grease, are still removable before it dries with the use of isopropyl alcohol or naphtha. Rub gently, then wash with mild soap, lukewarm water and rinse off. If you find mild abrasions, minimize them with gentle automobile polish.
Not Only For Aesthetics: Why Install RV Skylight
Skylights are not just a roof opening for lights in the sky; it is more than a window because it completes the comfort you need to make your stay in recreational vehicles so worth it. This is just one of the many reasons why RVer adds skylights.
Aesthetic Benefits
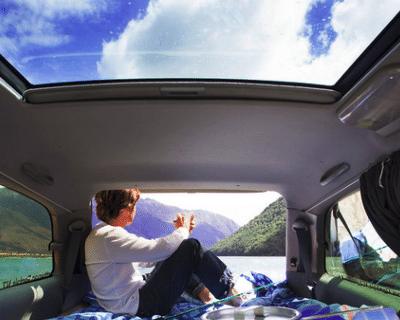
Having an RV Skylight provides you the view of the one-of-the-best-art in nature known as the sky, clouds, and the sunlight. Skylights are not limited to daylight purposes only because it is very beneficial at night which you can experience stargazing during starry nights inside in your RV. Adding skylights will make your environment look spacious, even if you have a small interior for the types of RV you own.
If the skylight is installed in your RV, you can access natural light from the sun throughout the day, which means light powered by electricity can no longer be needed. The natural light you get through the use of skylight will help save RV battery power, especially if you are out for dry camping and boondocking. The energy from the light electricity is conserved because the skylight enables you to access fresh air, which means the air conditioner can be turned off and all you have to do is roll out that roof window of your RV.
Turning off the air conditioner is one of the best techniques you want to apply if you explore distant places because this will help save battery power. This can be done along with rolling out your RV skylight to feel the breeze and wind day or night. Adding a skylight to your RV will help you to never miss out on the view of the sky. Either the different shapes of clouds or birds above the sky.
Health Benefits
Owning an RV is wealth, but health is wealthier yet, no worries, because skylight helps you do that in simple ways. Natural daylight is aesthetically beneficial because it is necessary for your health by producing vitamin D when exposed to sunlight. This can be achieved even inside your RV through the skylight.
Breathing fresh air inside the RV by opening your skylight is a must for your health to give you more energy, helps the lungs, and many other good benefits. RV Skylight is very beneficial for you when there are accidents because it will be your emergency exit.
Conclusion
Putting a skylight on your recreational vehicle is so worth it because it brings fresh air circulation, natural light, and a beautiful view of the skies, clouds, stars, and moon. If your RV doesn’t have a skylight, you can add one- DIY or the expert. For the DIY skylight installation, make sure to get the proper measurement. This includes choosing a perfect location where you want to cut your RV roof for skylight opening, which means no electrical wires are present in the area. Then you can start installing your skylight but just be extra careful. All in all, check and clean your skylight regularly so that it will last longer.


